Thursday, June 30, 2011

One fish

I must of been one of the few people who didn't own a Cricut Create a Critter cartridge until recently. My gf Teri gave me one for my birthday and I've been cutting animal pieces out at night and still need to put them together. I'm so glad this one is much simpler to assemble than the older cartridges that I have. Thanks Teri, I'm enjoying this one!A few things happened prior to using it. First I had to dust my machine off since it's been way over 2 years, then I couldn't find my mat. I spent 15 minutes searching for my mat, so I ended up opening a new package and after I was done cutting, I turned around and right there on my shelf were 3 used mats! Ugh!
Anyways, first I cut the fishbowl out of clear acetate that I bought from the store. Funny thing because over the weekend, I decided to pick up some clear acetate for no reason. I thought about the sticky adhesive getting all over the clear acetate but it actually came off the mat clean. Hope you can see it here. The stamp is a Hero Arts clear stamp from last year.
Thanks for stopping by today and check back soon because I'm working on some other ones to post.

Wednesday, June 29, 2011

Friends thank you cards

Happy humpday! I spent part of last weekend making some thank you cards to mail out during the week. I really should make a bunch of them so I always have some on hand. For this card, I used Dandelion Designs new friends stamp. There wasn't much to color because I paper pieced the kimono's on the girls. All the paper used is from a 6x6 Basic Grey paper pad called Sweet Threads which I bought from the store.The thank you stamp is from a Hero Arts set called Florentine Message Border. It is becoming one of my favorite thank you stamps. I used Spellbinders lacey circle die for the girls.
Hope you're having a wonderful day, I think I'm starting to catch my husband's cold. Thanks for stopping by today!!!

Monday, June 20, 2011

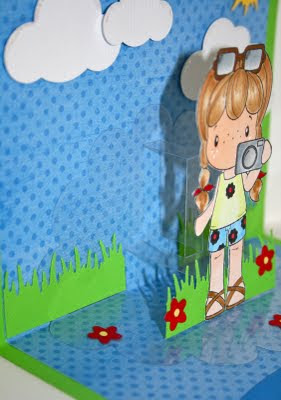
Wish you were here

I started this card off to be simple but then I started punching and die cutting and ended up with a whole background scene. Lol! Actually, I really love this new die called scallop circle 3-D pop-up by Karen Burniston. It is so easy to make a pop-up card with this die. There is nothing to piece together.I used Camera Brigitta from CC Designs. The white border on the card is a border punch from EK Success, the cloud punches are from Fiskars, the sun, banner and words are all cut from the Eclips machine. The grass punch is a MS punch and the red flowers are from an old Hello Kitty die.
I used glossy accents on her glasses and camera lens to give it a shine although you can't really see it in the photo.
I cut the acetate scallop circle pop-up from one of the textured impressions folder package since I didn't have any acetate paper. Now I wish I kept all those packages to recycle. I hope you can see in this photo how it pops up. Also, I used Tombow clear adhesive for vellum to attach the acetate to the card. You can barely see the adhesive through the acetate.
Here's what the Sizzix die looks like.
Thanks for stopping by today and hope your week is going well!!!

Wednesday, June 15, 2011

Simple thank-you cards

When the new jewelry dies from Sizzix arrived at the store, I went down there to purchase this die called frame & sculpted flower. These dies are actually original dies so you can use them for all your paper crafts.
I had to make some thank-you cards and went with a very simple look. I used Hero Arts solid dot background stamp for the card background.
The thank you stamp is from Hero Arts called florentine message border. This first card is orange with turquoise flowers.
The 2nd card is pink with orange flowers. I stamped the flower with Hero Art's friend definition background stamp.
And the last card is turquoise with pink flowers. I stamped the flower in pink ink and used Hero Art's friend definition background stamp again.
Thanks for stopping by and I hope I'll be able to post another card before the weekend. Have a great evening!!!

Thursday, June 09, 2011

Sweetalicious 3-D cupcake card

Happy Thursday!!! I saw this new Sizzix cupcake die at the store the other day and couldn't wait to make something with it. It's a 3-D cupcake XL die by Karen Burniston who is the queen of pop-up dies. At first I couldn't figure out how to assemble it but I went straight to her blog, and she has a video tutorial on making this pop-up. It's so easy once you make it. She also has some helpful hints on making pop-up cards like using a thicker cardstock for the card base. It works so much better. If you are using a lighter cardstock, it is better to apply a second piece on the inside of the card but cut it in half first before you glue it down. You can see where I cut it in half.The round scallop that I placed under the cupcake is from the Eclips cartridge called "basic shapes". It is not in the stores yet but will be soon.
Here's a closer look at the cupcake.
I used Ice Cream Brigitta from CC Designs. She's so cute and "sweetalicious" was also cut out with the Eclips from the sweetalicious cartridge.
Thanks for looking and hope you're having a wonderful day!!!

Thursday, June 02, 2011

Birthday Marci

Wow! I didn't think the last time I posted was over a week ago. I've been spending more time using my Eclips machine and trying out all the different cartridges that I have. The fancy oval shape was cut using the basic shapes cartridge. The cartridge is not out in the stores yet but will be soon.
Anyways, on to my project. I used the Sizzix caddy bag die once again but this time, I placed the pockets on both sides of the bag. And I cut the bag out using regular cardstock and not chipboard. I saw this cute Lala Land stamp in the store and decided to get it. This one is called Birthday Marci.
I stamped and embossed the bag with Hero Arts daisy background stamp and clear embossing powder.
Here's a photo of the side of the bag so you can see how I made it on both sides.
Well, I hope to get myself back into making more projects so I can post them here.
Have a great evening and thanks for stopping by and leaving me your sweet comments!
Related Posts Plugin for WordPress, Blogger...