 I used the Sizzix daisy doily die and the new turtle from the baby line.
 Here is a side view of the bag. You can put all kinds of treats in the bag or even craft supplies.
 This is what the bottom of the bag looks like. I just tied the top of the 2 pieces together with a piece of tulle.
Step 1: Cut 2 pieces out of the daisy doily die.
 Step 2: Cut a piece of cardstock 4 1/2" x 9". Score on the short side, 4" in and from the other side 4" in. There should be an inch in the middle from both score lines. I hope you can see it here.
Step 3: If you want to, you can use a Sizzix embossing folder to emboss the 2 daisy doily diecuts to give it added dimension. I like the Sizzix embossing folders because they are an A2 card size and it is bigger than the Cuttlebug folders. Step 4: Take your strip of cardstock and fold on the crease lines. It should look like this.
 Step 5: Place 2 way tape around the 4 sides of the daisy doily diecuts. I use Scor-Tape because it's stickier and holds a lot better. This is what it should look like when you lay the strip of cardstock over the 2 daisy doily diecuts.
Step 4: Take your strip of cardstock and fold on the crease lines. It should look like this.Step 5: Place 2 way tape around the 4 sides of the daisy doily diecuts. I use Scor-Tape because it's stickier and holds a lot better. This is what it should look like when you lay the strip of cardstock over the 2 daisy doily diecuts. Step 7: Go ahead and decorate the front of your bag and you're finished. Oh and don't forget your favors.
 Supplies:
Sizzix daisy doily die, Sizzix turtle die, Sizzix birthday #2 embossing folder, Spellbinders label 4 die, Imaginisce wild animals stamp, Hero Arts gemstones, tulle, cardstock and glitter.
Thanks for stopping by and have a great evening!!!
 This was taken on my phone so the coloring is a little off. The show will air the month of June on OC16.
  He's making that face again. Sorry Joy but this is the only photo that I got of you and Augie. I just wanted to share this with all of you and hope you don't mind that there isn't a craft project for today. Thanks for stopping by and I really appreciate reading all of your comments!!!


 Thanks for stopping by and have a great evening!
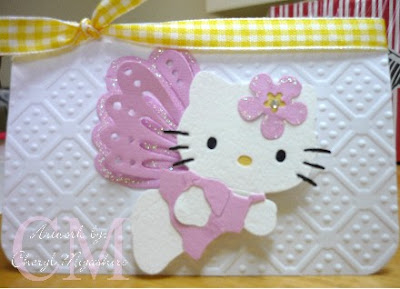 This is one of the new Hello Kitty embossing folders that should be arriving in the stores soon. At first I didn't think anything of it but when I ran it through the Big Shot, I loved the look of the impression that it left on the card. If that kitty looks familiar, it's a leftover from the make & take at

 before meeting him for dinner. I love that new grid background stamp from Hero Arts. It looks like printed paper. We went to Macaroni Grill at Ala Moana Shopping Center. They give you a lot of food and we probably could of shared one plate because we ate the same thing and we both had half a plate left.
 It is the cutest thing filled with a lot of treats! This is the first time I have seen the Anya image and it's a pretty good size. I like how she decorated the box using the Hello Kitty bunny and chicks die and I had never seen that fence die before but she was lucky she found her stash. Thanks Teri and you always know my favorite treats!
 I received these pretty handmade earrings in the mail on Friday and it was from
  Amy, who I met from one of my make & takes, made me this cute Easter bag of goodies (and it's filled with some of my favorites too) in a french fry box. So cute!!! I had other candies given to me but they somehow disappeared from the snack table. LOL!
 Here's a photo of the project we made yesterday at Scrapbook Heaven. It is a Hello Kitty magnet that is cut using chipboard and the Hello Kitty face embosslit from Sizzix. Ignore the blue can behind it. I had to use that to stick the magnet on. This was probably one of the fastest make & takes I have ever made using a Hello Kitty die.
 It's one of the new Sizzix XL dies called card flower. The bee is from a Hello Kitty deco strip die.
 I glittered it up with prisma glitter from Hero Arts. It was a real easy card to make.
 Step 1: First off, I always run all the cardstock that I am using to cut the pieces, through my Xyron machine. Keep all your scraps too because they come in handy whenever you do piecing.
 I am using the Hello Kitty bunny costume sizzlit die for this tutorial.


 Turn it over, add the yellow bow piece and put a gemstone on it. And you're done! I did cut the pink hand pieces off so the white hands would show through.
  I put it on this