 The first card is from the Beary Christmas set. I used all the colors that are in the Build a Bear logo to make the Christmas card. I wanted it to look fun and bright. This card took a little longer because I layered all the embossed pieces on the bear. I even had to take my magnifying glass out just so I could see where I was cutting. LOL!
 I added the bell to his bow but I think it might be hard to mail a card like this with the bell on it. See that cute little pompom on his cap, I got it from Stamps & Memories awhile back.
 This next card uses the Beary Birthday TI folder set. I like this folder because it has paw prints all on the background. I know it's a little hard to see on this photo. The actual Build a Bear dies have not come in yet so I had to substitute with an older bear die that I found at the store. This is bear #3. In fact there are still some dies left.
I'm still working on cutting kits for this week Saturday's make & take. Hope you can join us!
Thanks for stopping by today and have a great humpday!!!
Thanks for stopping by today and have a great humpday!!!


 Well, hope you all had a great weekend! I got a lot of scrapbooking done. I am such a slow scrapper that I only made 4 pages but at least I am getting closer to the end of the album.

 This is the pink mini album that we made last week for the make & take at the

 Last week Saturday, Jean from Dandelion did a make & take at the store and some of the customers brought us some cute raks. This one is from Cindy and Carol and she made this cute pumpkin out of a scallop circle Marvy punch. It was so cute the way they decorated it with Jean's stamps. Thanks so much Cindy and Carol!!!
 This next rak was from Kelli. She filled the bag with a lollipop, ribbons and a stamp. Thanks so much Kelli!!! And Carole gave the both of us her famous avocados again. I have never seen or eaten avocados like the ones she has on her tree but they taste so creamy. They look kind of strange but they really taste great!!! Thanks again Carole!
 The Hello Kitty cup uses 6 panels and the red Christmas cup uses 5 panels making it a little smaller candy cup. This die was really easy putting the cup together. The stamp image on the red cup is a new holiday release from Dandelion Designs.
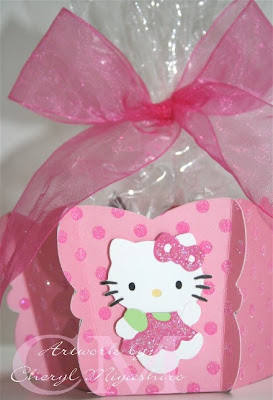 This is what the inside of the candy cups look like. See the difference in size. Both hold quite a bit of candy.
  Here's a really cute Halloween bag that my gf Teri made for me. It was filled with lots of goodies inside the bag and out of the bag. She even put some pretty nail polish in there for me. I actually had to take a picture of the bag out of it's clear package because by the time I took this photo, most of the goodies were eaten. LOL! I'm not sure the name of the stamp she used or company it is from but it's really cute! The bag is a Sizzix die exclusive for SU and see that flourish behind the stamped image? It is an EK Success punch that Teri bought from the
  Before I forget, this month is breast cancer awareness month. I will be doing a cute pink make & take over at the


 Then we met up at the Pearl City store in the afternoon.
  I also got a bag of avocados and some Ritz cracker snacks from Carole. Thanks so much Carole! I ate the snacks during the make & take. We didn't get to eat until after 3 pm.
 So glad to see all of you who came to the make & takes! Hope everyone enjoyed themselves. Cheri brought many samples with her and I can hardly wait to get a bunch of the new dies for myself!


 Here is how it looks empty. I used the MS drippy goo punch to decorate around the box.
 This past Saturday, I flew to the Hilo Ben Franklin store to do a make & take for their annual paper party. Sorry, I forgot to take a photo of my make & take. I'll post it later. Anyways, Lynn from
  And Jenny from Hilo, she also stopped by to give me one of these really cute treat boxes that she made and put a lot of Big Island Candies (cookies) in the box. Please visit her

 This is what we had for our make & take at the store this past Saturday. It was a real easy triangle box that you can put candy kisses or hersheys nuggets in. We used Dandelion stamps to decorate the box. Super cute to give treats for Halloween.

 The word stamp and candies are also part of the new release from Dandelion Designs. Hope you have a vonderful day and thanks for stopping by!!!
 And since I just had to use my MS punch, I punched a spiderweb for the background. It takes 2 punches to make this. One for the corners and one for the borders.


 Here's a shot from the top of the bag/box. As you can see, it is quite big to hold some sweet surprises.
 Supplies:
 I used the Sizzix dog die with paw from the baby line and cut it out of chipboard.
 This next card came about as I was playing with Tim Holtz distress embossing powder which I got from the
  This embossing powder is different from regular embossing powder as it looks and feels like sand. But it gives your stamped image a more textured look. I used some scraps to finish the card. The background stamp is a Hero Arts stamp and the cute little girl and word are Dandelion Design stamps.
 I made another card before making this one but I used different colors on the first card. You can't really see it well but I spritzed the pink shapeability die with a new product from Tsukineko called Ink Potion #9. I added Memento Rosebud reinker and Vegas gold metallic ink to the Ink Potion #9 bottle to get the sparkly gold effect on the paper.
  This photo is closer and you can see some of the sparkly on the paper.